Tuesday, October 15, 2013

Witchy Poo

It's been quite a few years since I've even wanted to do any Halloween crafting. I don't think I've even decorated inside for Halloween the last couple of years. We've done the outside, just not inside. I just wasn't into it. But this year, something changed. I'm actually excited for Halloween. So, I got out the decorations and with Baby Girl's help, got the house looking spooktacular (yes, I went there). I bought some new stuff, but wanted to make some things as well.

About 14 years ago I made a witch out of clay pots. It was the cutest thing ever! I made one for me and one for my mom. It was special to me because it was the first thing I had made for Halloween after my dad died. My dad was a HUGE Halloween fan. He dressed up every.single.year. I guess that's where part of my love for it came. So, to get my mom into decorating (as my dad would have done) I made her a Witchy Poo. Well, my mom died eleven years ago and I kept her witch. I'm glad I did because Bear accidentally broke mine. So, I used my mom's until Bear's dad accidentally broke hers about 8 years ago. When Bear called to tell me his dad had broke my mom's witch, I literally had to pull off the road and cry. I cried like my mom had died all over again. Still to this day, I get emotional about it. I know it was just a "thing" but it had great sentimental value to me. I guess that was another reason why I didn't want to make another Witchy Poo. But, this year, I decided I did want another one, so that's what I did.
Close up picture of Witchy Poo

If you're interested in making a Witchy Poo here's what you'll need and how to do it:

2- 8 inch clay pots
1- 8 inch platter
2- 6 inch clay pots
1- 6 inch platter
1-4 inch clay pot
raffia
wooden doll head
black felt
Halloween ribbon
green, purple, black and orange outdoor paint
wooden circles (extra small and small. I got a bag of assorted)
E6000 glue
Protective spray or shellac


First paint all your pots your base colors. They sky is the limit. Use your imagination. How do you want your Witchy Poo to look? Then glue her together. The body is the two 8 inch pots. The feet is the 6 inch platter. The head is one of the 6 inch pots. Her nose is the wooden doll head. Her eyes are the wooden circles. Her hair is the raffia. Her hat is the 8 inch platter and the last 6 inch pot and four inch pot. Her cape is made of  the felt. Make sure you let the glue set for at least a day before doing detail work on her. It may take a couple of coats of paint (especially if you are using orange or green). Take your time. It took me a couple of days to get her completed.

Have fun making her. Don't forget to protect her by spraying her with something like Crystal Clear. I hope you get a lot of enjoyment from her. 

Here she is outside

Monday, July 8, 2013

Gina's sandwich

So I was really in a creative food mood today and created a sandwich that was delish!! I'll prerequisite this blog by saying that I eat the same sandwich pretty much every day...An everything thin bagel (toasted) with cream cheese, turkey and spring salad. Sometimes, I'll add a mango salsa if I have some made. So, I had bought some goat cheese for a change. I've tasted it only once and knew it was similar to cream cheese, just more tangy. So I figured it would be nice to try it on my sandwich in lieu of the cream cheese. So I was thinking of what else I could put with it and thought, "red pepper, onion, and almond" and since I enjoy mango, I thought, "peaches" too. And to add some sweetness to balance the tartness, I thought, "honey".

This is how I made it:

I peeled and sliced a peach.

Then, I thinly sliced some red pepper and onions. To a pan, I added about a tbs of olive oil. I sauteed the onion and red peppers for a few minutes. I then put in a few almond slices to toast. I also added a splash of white wine vinegar as well.  In all, about 5 minutes. I then added a little bit of goat cheese (1/2-1 ounce). I heated those items until the cheese had melted.


On my toasted everything thin bagel, I put some turkey slices (3 on each side). I use Healthy Choice Oven Roasted Turkey.  It doesn't have any preservatives like other sandwich meats, so I feel pretty okay with eating it. I then added the cheese mixture (I put it on the turkey so it would drip through the hole in the bagel). Next, I added a few slices of peaches. I finished it off by drizzling some honey on top. I put the two pieces together and viola! A yummmmy sandwich!

It was so fast and tasty. This will be on the rotation for sure! It totally fit in my 200 calorie lunch and it kept me full until dinner.

Asian Flare Tilapia

Tonight I decided to make tilapia with an Asian flare. I had made tilapia many times on the grill and served it with mango salsa. Tonight, I wanted to try pan searing it and having a lovely sauce to go with it. I had already had a creative flare at lunch and was really trying to think of a simple, yet delicious sauce. So this is what I came up with:

I started with the sauce:

1/4 of pineapple, sliced and diced
1 tablespoon of grated fresh ginger
fresh orange juice
1 tablespoon of sugar
1/4 cup of chopped cilantro
1 mango, sliced and diced
1 tablespoon of olive oil
1-2 tablespoon low sodium soy sauce

I started out by peeling and grating the ginger. I have never used fresh ginger root before, so I Googled how to peel and grate it and I found a fantastic website that helped me out: http://www.wikihow.com/Grate-Ginger. I would have never thought to use a spoon to peel the root, but it worked like magic!

I peeled a mango and sliced it and put a few (about 3 good size or 4-5 smaller size) in a bowl. The rest, I diced. I also bought fresh pineapple already cut (there were about 6 wedges in the package) so, I diced three wedges, again keeping about 4-5 bits in the bowl with the sliced mango. I added the diced mangoes and pineapples together to use as garnish later and put those back in the fridge.

I put the grated ginger, sugar, chopped cilantro (which happens to be my FAVORITE herb of all time!!) in a small bowl.

To a medium pan, I added the olive oil and once heated, I added the mango and pineapple, a dash of salt,  black pepper and juice out of half an orange.  I cooked them for just a few minutes, then I added the ginger, sugar, cilantro and soy sauce. I cooked the sauce until it was cooked down. It looked like shit but tasted awesome! I have got to figure out how to make a sauce with fruit.

The Fish:

Tilapia
1 tbs of olive oil
1 tbs butter
salt
pepper
garlic powder
lemon

I pan seared the tilapia in a tablespoon of butter and oil. I seasoned the fish with salt, pepper and a tiny bit of garlic powder. I also squeezed half a lemon on the fish after it had been cooking about 5 minutes.

Ginger-sesame Jasmine Rice:

1 1/2 cups water
1 cup jasmine rice
1 tablespoon butter
1 tablespoon sesame seed oil
1 tablespoon mince garlic
1 tablespoon sesame seed
2 tsp fresh grated ginger
salt
pepper

I made a ginger-sesame seed jasmine rice. I added one tablespoon of butter and sesame oil to a pan and sauteed 1 tablespoon of sesame seed and 1 tablespoon of garlic for about 3 minutes. I then the grated ginger. While I was doing that, I brought 1 1/2 cups of water to boil and added 1 cup of jasmine rice. The rice cooked for 15 minutes. After cooking, I added the sesame, ginger and garlic and mixed well. I garnished the rice with the diced mangoes and pineapples.


Sauteed green beans w/ almonds

French style green beans (I only had frozen, but I would prefer fresh) Ever how much your family will eat.
1 tbs olive oil
almond slices to taste
salt
pepper
garlic powder

I also sauteed some french style green beans and sliced almonds in about a tablespoon of olive oil. I seasoned it with salt, pepper and garlic powder. It doesn't take long for these to cook and they are always a BIG hit with Baby Girl!

It was a yummy dish. Everyone really enjoyed it. I was only disappointed in the sauce. It was not sauce like at all. It was mush, but still very, very tasty. This is definitely on my make again list.

This is a healthy dish that is totally in my 500 calorie meal.

Friday, May 17, 2013

Cluck Went the Chicken

I had a really pleasant day today catching up with a dear friend as our daughters happily played together. I was glad I had planned an easy salad for dinner tonight because I was really hungry when I got home and I didn't have a whole lot of time to make dinner.

I made Chopped Greek Salad with Chicken.

What you'll need:


  • 1/3 cup red-wine vinegar
  • 2 tablespoons extra-virgin olive oil
  • 1 tablespoon chopped fresh dill, or oregano or 1 teaspoon dried
  • 1 teaspoon garlic powder
  • 1/4 teaspoon salt
  • 1/4 teaspoon freshly ground pepper
  • 6 cups chopped romaine lettuce
  • 2 1/2 cups chopped cooked chicken, (about 12 ounces; see Tip)
  • 2 medium tomatoes, chopped
  • 1 medium cucumber, peeled, seeded and chopped
  • 1/2 cup finely chopped red onion
  • 1/2 cup sliced ripe black olives
  • 1/2 cup crumbled feta cheese

What you do:

The recipe called for any cooked chicken. I actually grilled chicken for this recipe. I just seasoned two breasts with salt, pepper and a little garlic powder. While the chicken was grilling, I made the salad.

For the dressing combine the vinegar, oil, I used dried oregano, garlic powder, salt and powder in a container. I used the measuring cup I measured the vinegar in to add the other ingredients. Then whisk the ingredients well.

In a large bowl, I added the lettuce, tomatoes (I used Roma tomatoes), cucumber (I used an English cucumber), red onion, black olives and the feta cheese.  I also added a little bit of sea salt and ground fresh pepper. I then added the dressing and tossed the salad to mix the dressing well with the salad. The salad looked so pretty. Baby Girl even commented how nice it looked.

When the chicken was cooked, I let it cool for about 5 minutes then chopped it and put it in the salad. I mixed the salad again to distribute the chicken.

I also took two whole-wheat pita bread and brushed a little olive oil on them and added a little bit of Parmesan cheese on top. I toasted them until the cheese was melted and the bread golden brown. I cut them into slices and served with marinara sauce. They were like bread sticks.

This salad was DELICIOUS! I'm not a fan of Italian dressing but this was exceptional. All the ingredients just complimented each other so nicely. Nothing over powered one another. 

I highly recommend this easy to make salad. It was also very filling. 

Thursday, May 16, 2013

Big Mac Attack!

I had a pretty stressful day today. I went and had my annual mammogram. The actual mammogram doesn't hurt. I've never minded it. I do have to say, I preferred it before I got my breast reduction, so it is true, the smaller the boob the more it's uncomfortable. What I hate is the waiting. I've had a couple of scares and they always play through my mind while I'm waiting to be smooshed and even after until I either get a letter (which is good news) or the dreaded phone call to come back. I've set my thoughts on positive and am sure I'll get the good news letter but never the less, it still stresses me. When I got done, which was around lunch time, I immediately wanted a Big Mac. So now you know my deep rooted secret (only if you don't know me), my comfort food is junk food. Hello, my name is Gina and I'm a junk food junkie.

Since being on this new way of eating, I've steered clear of all pre-made/fast food. I almost caved and asked Bear to bring us home a Big Mac, which he would do without hesitation, but then I took a breath and thought, "No! I'm not going to undo the work I've done!" A few years back, I ran across a low calorie version of a Big Mac. It was by Devin Alexander. So, I found the recipe and decided that I will have my Big Mac and french fries I am so craving.


Here's what you'll need: (this is for one burger)


3 ounces 96% lean ground beef (about 1⁄3 cup)
 2 pinches of salt
 1 sesame seed hamburger bun + 1 bun bottom
 1 slice (1⁄2 ounce) 2% milk yellow American cheese
 1 tablespoon + 1 teaspoon + 1 tablespoon McDonald’s Big Mac
 Sauce (below)
 1 teaspoon finely chopped white onion
 1⁄3 cup shredded iceberg lettuce
 2 rounds dill pickle

Here's how to do it:

I used ground sirloin because I just don't trust what's in lean ground beef. It makes me just wonder. I also used regular Kraft Singles. I know, I know...they are not real cheese, but dang it! For a Big Mac, you gotta have just regular old Kraft Singles! I took 9 oz of meat and divided it into 6 patties. You want them to be thin. I seasoned both sides of the patties with salt. Then as the recipe states, I put them on wax paper on a plate and put them in the freezer for about 5 minutes.

I then cooked them on my electric griddle. Man, do I love that thing! They only take a few minutes on each side because they are so thin.

I took the buns and cut the top bun in half horizontally so I would only use one bun instead of a bun and a half. I mean, what are you going to do with the other top bun? Such a waste! Then I toasted them on the griddle while the burgers where cooking.

I then put just one piece of cheese on one of the patties for each Big Mac. Then I assembled the burger. I put the sauce on the bottom, then added the burger with the cheese then added the bun that was cut from the top part of the bun and then added the last burger. I then placed the onions, pickles and lettuce and placed more sauce on the top bun. Viola! you now have your Big Mac!

Here's the recipe for the sauce:

What you'll need:


1⁄3 cup low-fat mayonnaise
2 teaspoons dill pickle relish
2 teaspoons ketchup
2 teaspoons sugar
2 teaspoons yellow mustard
1 tablespoon + 1 teaspoon finely chopped white onion

Here's how to make it:

Put the mayo, relish, ketchup, sugar and mustard in a bowl and mix. I actually divided my mixture as Bear said he didn't want any and Baby Girl wasn't eating it either. It will stay good in the frig for up to a month so I put what I wasn't going to use tonight in a container to use later. I then added about 2 teaspoons of chopped onion to my mixture for tonight. Easy peasy. The only thing, and I'm not sure if it's because I haven't ate a lot of sugar lately, it seemed really sweet to me. I probably could of/should of left out the sugar as the low fat mayo was sweet enough.

I also made homemade fries to go with my Big Mac:

What you'll need:

I used 4 Russet Potatoes
salt, pepper
and olive oil

Peel your potatoes. I cut my in half vertically and then cut them into fries. I then put the fries in a bowl of water. This will make your fries crispy when you cook them in the oven. If I'm in a hurry, I add them to a bowl of hot (out of the tap) water. Tonight, I had plenty of time, so I put them in a bowl and let them sit until I was ready to bake the fries. Once I was ready, I drained the water and added olive oil (enough to get on all the potatoes, about a tablespoon) and salt and pepper. I put them on a cookie sheet that I've sprayed with cooking spray. I then put them in a preheated 425 degree oven and cook for about 30-40 minutes. Until golden and crispy. They are so yummy and healthy as you're not frying them. I did goof tonight and put my oven on 450! Why in the world I did that I have no idea, so my fries burned. Some were still edible but over 3/4 had to be tossed.

Now if only I could figure out how to make Cheester's Hot Fries I'd be in bliss.

Monday, May 13, 2013

It's Greek To Me!

Tonight for dinner I made Mini Greek-style Meat Loaves with Arugula Salad. 

What you'll need: 


  • 10 ounce ground sirloin 
  • 5 ounces lean ground lamb
  • 1/3 cup dry breadcrumbs
  • 1/3 cup grated red onion
  • 4 teaspoons chopped fresh mint
  • 4 teaspoons chopped fresh thyme
  • 3/8 teaspoon salt, divided
  • 1/4 teaspoon ground allspice
  • 1/4 teaspoon crushed red pepper
  • 3 garlic cloves, minced
  • 1 large egg, lightly beaten 
  • Cooking spray 
  • 1/2 cup plain fat-free Greek yogurt 
  • 2 ounces reduced-fat feta, crumbled
  • 2 tablespoons fresh lemon juice, divided
  • 1 tablespoon extra-virgin olive oil
  • 1/4 teaspoon freshly ground black pepper
  • 4 cups baby arugula leaves
  • 1 1/2 cups (1/4-inch-thick) diagonally sliced seeded peeled cucumber
How to make it: 

I chopped all my herbs first and put 1 tbs each of the mint and thyme in a bowl. I put 1 tsp each of the mint and thyme in a smaller bowl to use for the "sauce". I couldn't grate the onion so I finely chopped that sucker and cried while doing it. I had forgotten how strong onions are that are not Sweet Onions (which is what I use 99% of the time). I put the onions in their own bowl. In the bowl with the 2 tbs of herbs in it I added 1/4 tsp of sea salt, the ground all spice, red pepper and the fresh minced garlic. I sat that bowl off to the side until I was ready to make the mini meatloaves. 

In a glass bowl, I added the yogurt, feta cheese, 1 tbs of lemon juice and the 2 tsp of the reserved herbs. I didn't have couldn't find my mini processor so I used my hand wand (which didn't work too well, but well enough)to mix the items. After mixing with the hand wand, I did use a whisk as well. Once it wasn't so lumpy, I put it the frig until I served the meal. 

I then mixed the dressing which consisted of 1 tbs of lemon juice, 1 tbs of olive oil, 1/8 tsp of salt and 1/4 tsp of freshly ground pepper. I whisked those ingredients together well. I then used a baby arugula and baby spinach mix I got from the store. I then peeled and sliced an English cucumber. I added those together in a big bowl w/ a lid and added the dressing and shook the crap out of it to coat it well. I stuck the salad in the frig too until it was time to eat.

I turned the oven on to 450 degrees. I then used 15 oz of ground sirloin. The recipe called for 10 oz ground sirloin and 5 oz ground lamb. Well, I've never eaten lamb and I didn't want to buy a pound for who knows how much (I know it is more expensive than beef) to maybe not like it. Not to mention it is a baby sheep. That makes me sad. I know, I know...a little bit of a double standard. I can eat beef and chicken but the only baby I eat of those is eggs aaannd they are not babies yet, so I feel okay with that. Any way, back to making the meal...I took the meat and added the bread crumbs and onions. I mixed it pretty well by using my hands. Then I added in the bowl of herbs and other items. I mixed it with my hands as well. By this time, Bear was home so I had him lightly beat the egg. He looked at me like I was speaking in tongues when I asked him to lightly beat the egg. I forgotten he's not a cook. LOL. Once I explained to him what it meant, he got right on it. I had him add the egg to the meat mixture and I mixed it well by using my hands. I was going to use my ice cream scooper to use to put the meat in 8 sprayed muffin cups in a muffin pan, but my scooper is broken, so I just used my hands. I tore off pieces, like making cookies and put them in the muffin cups. I baked the meatloaves for 13 minutes and then put them under the broiler for 2 minutes for a total of 15 minutes. 

I also made mashed potatoes to go with it. I mean you can't have meatloaf without potatoes. To cut down on the fat, I used chicken bouillon cubes instead of butter. I did add some garlic powder because I felt it would compliment the rest of the meal. 

The Verdict:

I'm not going to lie. When I tasted the "sauce" it was AWFUL! I thought, "oh crap! What I have made?" But I was going to wait and see how it all came together before really judging the meal. But in the back of my mind I thought, "Baby Girl and Bear will love this and I'll hate it." That's the norm. Bear asked how it was going to be and I was truthful and said we may have to end up going out to eat. But that didn't happen. With the sauce on the side and added it to each bite of the meat it was delicious! The salad was really nice too. Again, I haven't bought new EVOO so it still had that too "robust flavor" but it was nice with the cucumber. And as predicted, Bear and Baby Girl enjoyed the sauce and meat a little more than I did. I could do without the sauce. Both Bear and I loved the salad (the cucumbers were outstanding) but Baby Girl didn't like it at all. In all, I'll make this meal again. It was easy and very yummy and HEALTHY! 

Give it a try.  You won't be disappointed! 

Sunday, May 12, 2013

Sweet Tooth Fairy

I was wanting something sweet so I made Chocolate Almond Cherry Crisps.
Dense yummy balls...
What you'll need:
 1 cup of semi-sweet chocolate chips
 3/4 cup of white chocolate chips
1 1/2 cups Rice Krispies
 3/4 cup of chopped cherries
1/3 cup toasted chopped almonds
 1/2 tsp vanilla.

What I did: I melted the chocolate in the microwave in a microwavable bowl. I then added all the other ingredients and stirred away. I took wax paper and put a sheet on a cookie sheet. I used a cookie scoop and dropped about 30 crisps. I put the sheet in the refrigerator for about an hour.

The Verdict: 2 crisps are about 100 calories. Perfect for one of my snack allowance.

They were so easy and yummy. Bear even liked them. Two is plenty. It gives you all the sweetness you need. I love the CRUNCH too. The original recipe doesn't call for the cherries or the almonds to be chopped or even for the almonds to be toasted. I felt toasted almonds would taste better so that's why I chose to toast them. I also didn't want the almonds or cherries to be over powering so that is why I chopped them. I will definitely be making these sweet gems again!!


I also made, a few days ago, Brownie Cookies.
The last two cookies
What you'll need:
1 cup all purpose flour
1/4 teaspoon baking soda
1/8 teaspoon salt
5 tablespoons butter
7 tablespoons unsweetened cocoa 
2/3 cup granulated sugar
1/3 cup packed brown sugar
1/3 cup plain low fat yogurt
1 teaspoon vanilla extract
cooking spray

Preheat the oven to 350 degrees
Spoon in the flour using a knife to level. It will make the cookie more airy. Combine the flour, baking soda and salt. Melt the butter in a saucepan. Stir in the cocoa (again, I used a spoon to add the cocoa then leveled with a knife) and sugars. The result will look like brown yummy sand. Add to the "sand" the yogurt and vanilla. Stir to mix. Add the flour mixture and stir until wet. It will resemble brownie mix and smell like it too! I almost made brownies, but decided to stick to the recipe. Spray your cookie sheets with your cooking spray. I then used my trusty cookie scoop and dropped about 24 cookies. I have a gas oven so I baked mine for 10 minutes. Take them out and let them cool 3 minutes on the sheets then transfer to cooling racks to continue to cool. I put them in plastic bags to keep. They're only two left so that tells me something. :)

The Verdict: One cookie is around 80 calories. That's why I've only eaten two. That's almost one of my snack calorie allowance.

I ate one the day I made them (they weren't quite cooled) and then ate another one the next day as a dessert. I prefer them cooled. They were like a brownie with crispy edges. That's when I named them Brownie Cookies. Both Bear and Baby Girl like the cookies. Bear more so than Baby Girl. They are a good alternative when you want a more healthy cookie.

  • Both recipes are great for your sweet tooth! Enjoy!


Happy Mother's Day Dinner


Sticking with my healthy eating I made Grilled Asian Flank Steak with Mango Salad. I used sirloin steak instead o flank because I LOVE sirloin. It was sooo tasty. Don't be afraid of the peanut butter in the "dressing" it gives it the peanut taste. It's best to eat the steak and salad together to get the full Asian flavors. I really don't like brown rice but I felt it needed something. I only ate about a quarter of the rice. The salad and steak was really filling. Baby Girl only liked the steak. Bear liked it all. I enjoyed it as well. I definitely will be adding this on my dinner rotation.

Enjoy!

Saturday, May 11, 2013

Healthy Eating

I had my annual Doctor's visit last month. She told me what I already knew: I HAD to lose weight. She even suggested a liquid diet; which made me gasp. She'd never even remotely spoke of doing "fad" diets before. I knew going in I was overweight but when your doctor tells you under no uncertain terms you HAVE to lose weight for your health, well I really took it to heart. Name a fatal disease and either one of my parents had it. Heart disease? My dad. Diabetes? My mom. Cancer? My mom. High blood pressure? Both my parents.

So I began the "SlimFast" diet. Blech. No way could I drink 2/3 of my meals. I have to eat. So staying in the mindset of  SlimFast, I have decided to eat my calories as they suggest. SlimFast suggests drinking 2 shakes (190 calories each), eating 3 snacks (100 calories each) and one 500 calories balance meal. So in all you're eating around 1200 calories a day.

So my basic days goes like this: around 10 or 11am I drink my morning shake. I don't really feel like cooking first thing in the morning so it's convenient. This morning, I did make zucchini mini muffins. I ate one muffin, 3 pieces of center cut bacon and a scrambled egg for a total of about 190 calories.

Around 1:00pm I eat a 100 calorie snack. I Googled "100 calorie snack" and was pleased to see there's quite a few on the web. My favorite is cucumber slices, 11 Townhouse Oil and Sea Salt Flatbread Crackers and Tribe red pepper hummus. Today, I had Salmon and cucumber bites. It was sooo yummy and filling. The salmon you get is important. I tried several smoked variety and finally found one that wasn't too salty or fishy. I got it from Publix: Vita Wild Nova Salmon. Delish!

Around 3:00-3:30 I eat lunch. Sometimes, I combine a snack and lunch depending on how hungry I am at the time. My go to lunch lately has been Pepperidge Farm Thin Everything Bagel with 1 tsp of low fat cream cheese, about an ounce of turkey and spring salad sandwich. It is filling and yummy. Today, I was hungry, so I added a cup of Campbell's 100% Natural Tomato Garden Soup. Yumm.

I begin making dinner around 5:30 or 6:00. If I haven't eaten a snack with lunch, I eat one while prepping dinner. Usually the humus again. I just can't get enough of Tribe's Red Pepper!! Tonight we had King Salmon with Tomato & Peach Salsa.  I also served Parmesan Couscous with grilled vegetables (asparagus, red pepper, and yellow squash with garlic). I LOVED the salsa with the salmon. They really complimented each other. Bear liked it as well; Baby Girl, not so much. But she did enjoy the salmon.

 I kept wondering why some of my food was tasting "off" and found out it was my olive oil. It's EVOO but didn't taste like it. It was too strong. I took a look at the bottle and noticed "robust flavor" on it. Well no duh! So I have to get a new bottle of EVOO and my meals will be even better.

Around 9:00-9:30 I eat my last snack. Sometimes I'm in the mood for a sweet so I'll eat either Oikos Fruit on the Bottom Greek Yogurt or Healthy Choice Frozen Greek Yogurt. I also found mini ice cream sandwiches when I want a special treat. They are 100 calories and oh so cute!

I've been doing this for a little over a week and I feel amazing! I have no idea if I've lost any weight. I'm going to wait a month before weighing. I don't want to get discourage. I have more energy and just feel over all better.

I'm still trying to workout at least 3 times a week. We made it to the gym twice this week and Baby Girl, Bear and I played some ball for two days. My goal is to stay healthy. It's not about thin; it's about being here to see my grand babies and hopefully, great grand babies!

I do have to say that it's so expensive to eat healthy. I find it almost criminal. But we aren't eating out because the meals I'm making are damn near gourmet meals so that is saving money.  I plan on blogging later on some of the meals I've made. Some have been HUGE hits and some have been misses.

I'm hoping to have a huge smile from my doctor next year when she's seen the hard work I've done for me and my family.

Sunday, May 5, 2013

And then there was light...

I finished my chandelier for outside.

I had bought a cheap fire pit from Wally world. I think it was $30. I took the legs from it to use as the base. I then went to my local Ace Hardware and got four 2 feet chains to hang the base. I also bought so S hooks and eight 1 foot chains for the candle holders.

I made the candle holders out of half pint jars from Wally World. I got glass paint to paint the inside of the jars. Baby Girl helped me with the painting. I got gold puff paint (which was so hard to find. I finally found it at Wally World but it has glitter in it which I really didn't want) to do the designs on the outside. I added the smaller 1 feet chains on the candle holders to put on the base.

Bear helped out with drilling some holes on the base of the feet to add the chains. Then I attached the candle holders on the base. Bear then climb the ladder and hung it for me.

Here are some pictures:

 the base...the legs from the fire pit
 How Bear connected the chain to the legs. He drilled the hole and then added an eye hook.
 without the candle holders
 I added the chain on the candle holders and put it on the base
 In it's home.
 Lit up.
up close

I'm really please with the outcome even though the holders/jars do not look like what I wanted them to look at but they are pretty non-the-less.

Wednesday, May 1, 2013

I got the case of Spring Fever!

I absolutely love the outdoors. I could probably live outside. This is where Bear and I don't mesh. He's not so much on the outside. I think he just doesn't know how to just sit and do nothing but to listen to the wind and birds. He's got to have something occupy him. I, on the other hand, could sit and listen to nature for hours and I do it as often as I can.

A couple of years ago, a great friend and her hubby helped Bear and me build a roof over our patio. The sun shines in my back yard all day and in the summer, it's brutal and I never got to enjoy my yard during that time. With this roof, I can stay out pretty much all day and enjoy the outdoors.
the porch

I also made a special corner of the yard for me. I planted a rose, gardenia and jasmine bushes. I added an arbor and added jasmine around it as well. My corner is the best thing ever. The plants have grown so nicely and it is looking more and more like my vision. The only problem...I didn't really have any where to sit while I was back there. Nothing just seemed to click. Then I got the fever...Spring Fever and my creative side let loose so I could further enjoy my back yard.

Since we are a one income family, I don't have the luxury of just going out and buying items that I want. I have to be ingenious and create my own. We had an old hammock stand for a long time but the hammock was long gone. When we cleaned the yard a couple of years ago, Bear wanted to get rid of the stand. I was adamant and refused to let it go. Something told me I'd be needing it one day. Well, that day was the other day. But the problem? I had no funds to buy a $80 or more hammock. So I did what I always do...Googled it! And I came upon a guy explaining how to make a hammock out of...a SHEET! Just a regular sheet. BINGO! I found my answer. I have plenty of sheets hanging around, so why not? The only thing I needed was rope. Easy enough. So I go to Lowes to purchase the rope and one chain and a S hook(they were missing from the stand). The kind lady cut my chain (enough to hold Bear's weight) and then proceeded to tell us about her on-line gaming addiction. That's a totally different story that I'll not bore you with at the moment. In all I spent around $15 for the rope, chain and hardware. Not bad! I do want to say I bought waaayyy too much rope. I probably only needed 10 foot but got 50 instead because, well, I just didn't know. So I have plenty of rope left over and could probably make 5 more hammocks. So, in all, that really is a great deal! I get home and can not wait to try out this hammock. I mean can it really hold an adult? A twin sheet? Well, I knotted the ends as he described and pulled extra hard just to make sure they were tight. Then I doubled the rope and then tied it under the knot with a "lark's head knot". I then just put the two ends in the chain and did a double knot (I was just testing it out. I actually have two welded rings I'm going to use to attach to the S hooks). And, being a chicken, asked Baby Girl to get in it first. She fit fine and nothing fell, so I took the plunge and got in. I was in HEAVEN! You can pull the sides up around you so you are in a cocoon. When Bear got home, I asked him to try it and it even held him. So it's quite a success. So I now have perfect seating for my corner. I can lay and watch the birds eat from the feeder and be in bliss!
My area w/ Baby Girl enjoying the hammock
Baby Girl enjoying the hammock in my area.

This is just the tip of the iceberg as far as my outdoor seating goes. I also wanted an outdoor futon. Well, if I couldn't afford a hammock, I sure as shit couldn't afford a futon much less and outdoor one. So once again, Google was my friend.

I already had an old bed frame up in the attic. I got it down and was elated to find it was a twin (well it actually goes up to a queen but I was needing a twin). I found online how to make a simple futon mattress . It's more like a Japanese futon mattress. It doesn't have the back and I was okay with that. I was putting it up against the wall so I was envisioning it more like a daybed any way. The directions said to get a zipper mattress cover and just stuff it with other mattress covers. Being on a budget, I couldn't see spending $60 or more on mattress covers to stuff in the zipper cover. So I went to Target and purchased a zipper vinyl cover so it's water proof. Then I did get one mattress cover and I bought the cheapest foam topper they had. In all I spent around $30 on those items. I had an old queen size quilt (again, just hanging out in the attic). So I sandwiched the foam in the quilt. Then put the mattress cover over that so it would hold it together and put that in the zipper cover. I needed a cover because let's face it a white vinyl mattress would get dirty and hot outside. So I went to Joanne's to see what they had. Luckily for me, my Joanne's store is moving to a better location down the street so they are liquidating the store. I got almost 7 yards of outdoor material for $30.00! I saved over $130 on the material alone! True there were only 3 selections, but I like what I got.

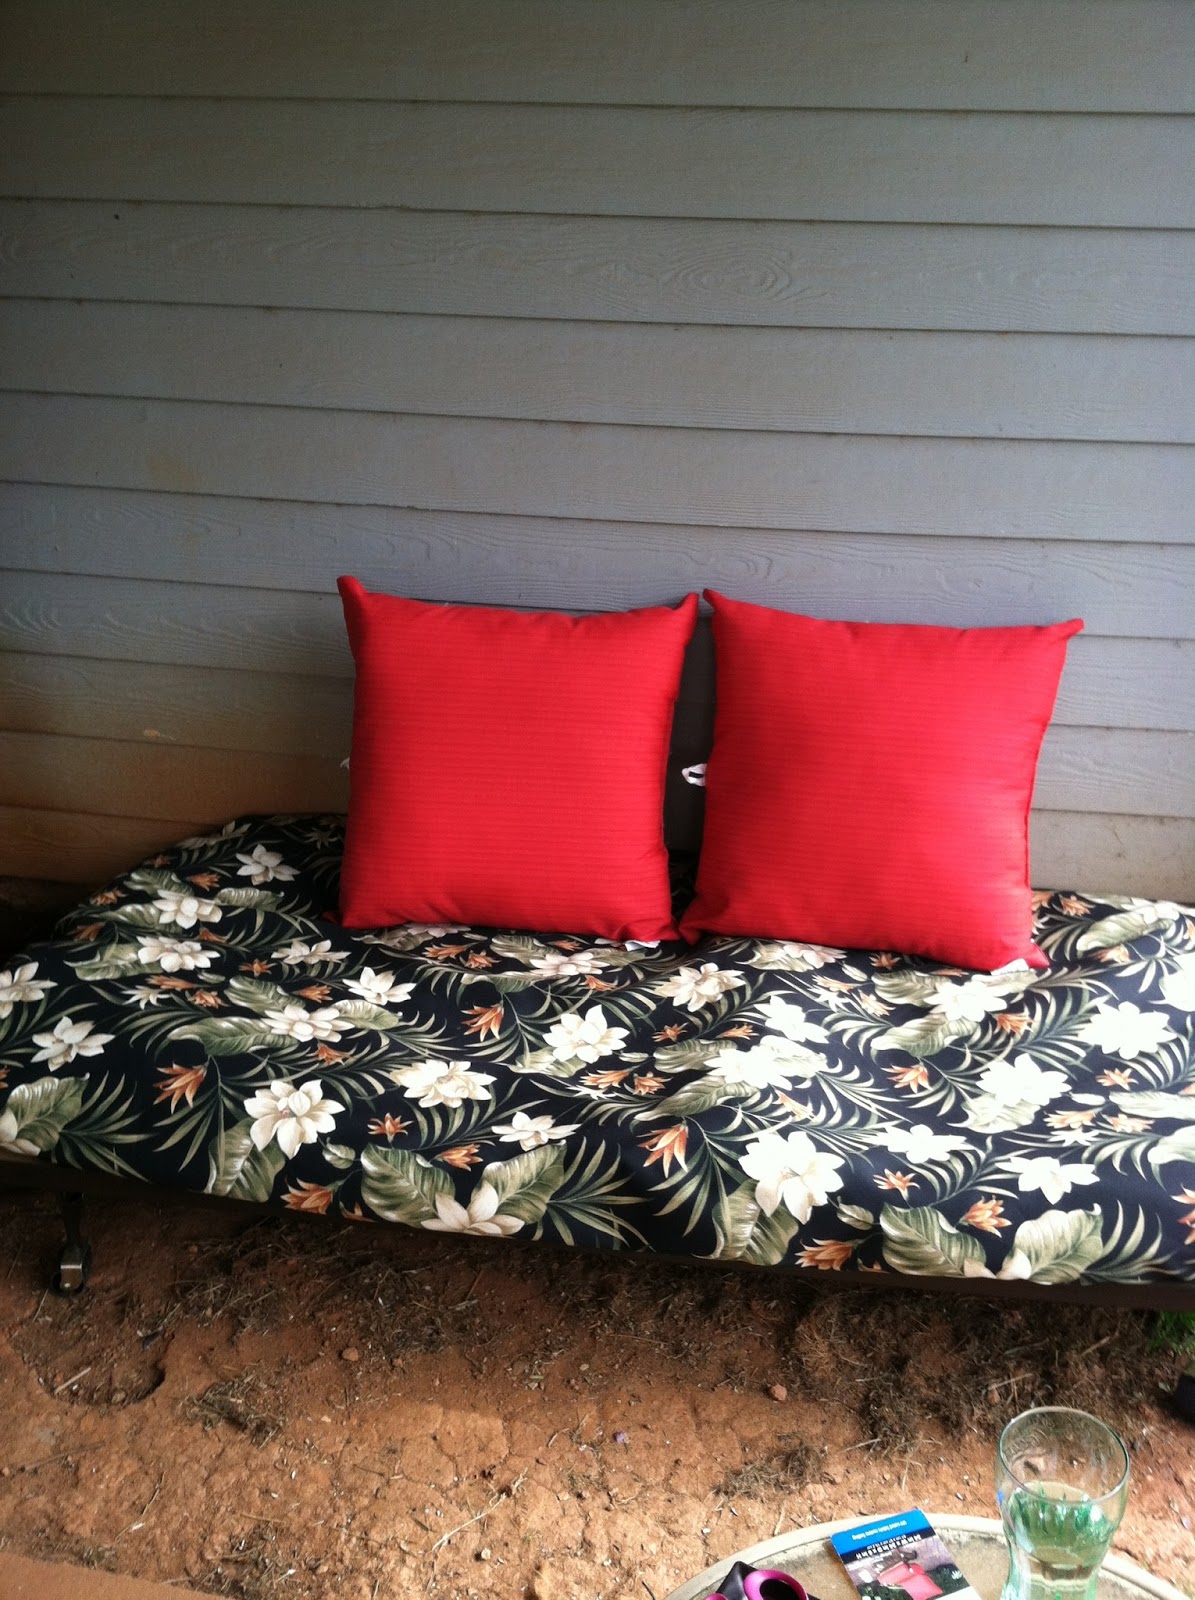
Now, I am no seamstress.at.all. I laid the material over the cover and cut it out. I know, not a professional way to do it, but hey! it worked. I get out my cheap sewing machine. This is when I really kick myself for not keeping my mom's top of the line sewing machine, but I really didn't think I'd need a sewing machine. Regardless, I get mine and get it all set up. I had to actually Google how to use it. Yes, that just shows you how infrequent and long it's been since I used it last. I was actually surprised I knew where it was. No kidding. Well, Baby Girl had to help me feed it and it did it's job 3/4 of the way. The last side, about  2/3 done the sewing machine would just not work. It kept jamming, so I had to do the rest by hand. But I got it done! I then put the mattress I made in the cover (kind of like a pillow case) and viola! I have my outdoor futon bed! I bought two big red outdoor pillows from Wally world ($15 bucks a piece) to use as the back. Bear and I went to Home Depot and got them to cut a piece of plywood to fit the bed to use as the base.  I love it! I spent most of my day on it today! So in all I spent around $75...not too shabby.
My outdoor futon


 I also made a fire pot. Bear saw one at Lowes and really liked it. But again, too pricey. I went to Wally World and got a ceramic glazed (inside and out) planter for $12. I also got like a grill basket (it's thin and made out of aluminum. It's to hold the gel fuel canister. It can take the heat) for $4 for a pack of 3.  I went to the dollar store and got a bag of pebbles and a couple of paper clip holders. I needed something round to set the mesh grill on so the fuel canister would be even with the opening. They worked out perfectly. I stacked the paper clip holders on top of each other. Cut the grill with scissors and put it on top of the paper clip holder. I then put the canister on top of the grill and lastly, I added the rock around the canister. It's so pretty and works like a charm. I was pretty hesitant on using the fuel gel because I read it's like napalm if you get it on you. But I have a box of baking soda nearby and a snuffer to put the flame out so I feel more at ease when using it.
My fire pot. When you're sitting down, you can't see the canister.


I have other items I'm working on...tiki torches made out of wine bottles and a chandelier. I'll post about those later. I'm sure there's an end to this Spring Fever, but not any time soon. I hope. :)

Wednesday, May 30, 2012

Hair today...gone tomorrow

So, as in my previous blog about my hair, the saga continues. I had to forgo trying to find an alternative to shampoo and conditioner. It was just not working for me. I used Dr. Bonner's lavender shampoo and my regular conditioner, but my hair was still not silky soft as before. I decided to try V05, yep folks you read that right, V05. Because I'm a frugal momma, I've been using cheap shampoo as soap for years. It's way cheaper than purchasing a $4.00 bottle of body wash. I usually used Suave because it was cheap; well V05 is way cheaper now. It normally runs about .85 a bottle. When Kroger has it on sale, it's like .74 a bottle. So the other day, Baby Girl and I were at Kroger and there was a sale on V05 so I started grabbing a bunch for our body wash. Then it dawned on me: why not try some for my hair? I mean what could it hurt in this stage of the game? They have some tea series shampoos and conditioners so I grabbed blackberry and sage tea shampoo and conditioner. It is marvelous! My hair is back to it's silky soft self! I love it and it is cheap! SCORE!!

Now to the coloring of my hair. If I did not color my hair, it would be white. The last couple of times I colored my hair with synthetic dyes, I had horrible irritation to my scalp. I made the decision to try a more natural approach. This was about 8-10 weeks ago.

I started off with trying to use tea for two weeks to bring some color back. All I got was a drippy mess and nothing else. It didn't change the color one bit.

I finally get sage and rosemary and some henna powder. This is a whole different story. I had ordered some sage and rosemary from a crappy online site. For three weeks I have nothing, nada, not a thing. I email inquiring where my purchase was at and she tells me it will be shipped the next week. So I patiently wait and at the end of the week I still did not have my herbs. I emailed again to let her know that if the order had not been shipped to please cancel the order and refund me my 39 bucks. She refunded me and then proceeded to berate me for canceling the order after waiting for almost a month. I kindly replied to her email  letting her know that a well established business would not berate a first time buyer for inquiring about their order. That seemed to shut her up. So I decided to purchase my herbs from another online vendor that I've used before. I know what you're thinking, "why didn't you use them in the first place?" To that question my answer is, " I don't know." lol. Anyway, while I was adding my sage (I actually got lucky and got some rosemary at the State Farmer's Market when we went a few weeks ago) I noticed she had henna powder so I ordered that as well. It was cheaper than what I found at Henna for hair. And now I know why; the henna powder was old and did not do anything. While the sage and rosemary made my hair feel yummy, all it did to my white hair was to make it whiter and not darker. So back to the drawing board.

my hair in overhead lighting after using henna
my hair in natural lighting after dying with henna
So I finally purchased some henna from Henna for Hair. I should have done that from the very get-go. You live and learn. Where it took me almost 8 weeks to get my other herbs and henna I'd tried, it took me less than a week to get this henna. So, you go Henna for Hair, you go! Last night (which happened to be my 25th anniversary. Happy anniversary, Bear. Love you!) Bear helped apply the henna to my hair. I slept on it, not very well mind you. I was so excited about seeing the color. I woke up extremely early; I don't think it was even 6:00 yet. I rinsed out the color and was shocked to see that my white now looked like Ronald McDonald red. I dried it and decided it didn't look "that" bad. I'm still disappointed only because I let my roots get so long it looks the same as it did before just with red instead of white. So, I've ordered some indigo to put on top of the henna. I'm hoping that will get me to my dark brown color. I'll just upkeep it with indigo and henna.

In the end, I'm glad I went the natural route. My scalp is so thanking me for it. Eventually, I'll just let my white hair fly but until then, I'll use henna and indigo. Happy hair day!

Friday, May 25, 2012

Crock pot dinners

Ole Betsy
Since I get home late on Mon., Tues., and Thurs., due to kickboxing, I have turned to my crock pot to feed us so we don't have to go out and eat or starve to death waiting for dinner to get done.

So far I've made four meals in the crock pot. Some were fantastic and some were okay. Let's start with the fantastic meals...

Crock pot Lasagna. Yep, you read that right...crock pot Lasagna. So easy and so yummy. I want to preface this by saying I have an old crock pot. I don't even know how old it is; that's how old it is. Easily over 12 years old. So all I have is low and high on my pot. Not the newly added warm function. I so wish I did have that, but I don't. Maybe I'll get a new pot in the near future with the warm feature, but for right now "Ole  Betsy" will have to do. So the lasagna recipe is easy enough. You brown your meat (I use ground chuck or sirloin)and drain the fat. Add a jar of Ragu (or homemade sauce or your favorite spaghetti sauce. I love Ragu traditional so that is what I always use). Get a box of lasagna noodles. It can be a regular box; it doesn't have to be the no boil kind, but you can use those as well. Take about 3-4 cups of mozzarella cheese, a container of ricotta cheese and about 1/2 cup of Parmesan cheese and mix them together. You could substitute cottage cheese for the ricotta, but I like the authentic taste of ricotta. Spray your pot with a non-stick spray. Add about 1/3 of your meat mixture to the pot. Add a layer of noodles. I break mine in half to get them in the pot. Now, don't think the meat has to be perfectly covered (this was a little frustrating to me at first, but I slowly realized it wasn't going to happen in the pot). Just cover as best as you can. Then add a layer of cheese mixture. Add another layer of noodles. Another layer of meat mixture. Another layer of noodles. Another layer of cheese mixture. Another layer of noodles and the rest of the meat mixture. Now, this is when I wish I had the newer crock pot model with the warm setting. If you are going to be away all day...you have to have the warm setting or your lasagna will just dry to blech. The first time I made this, I went to the park and was gone for probably 4-5 hours (maybe longer)with it on low. When I got home, the lasagna was DRY. It was still edible but it was, well, dry. The second time I made it I was only gone for about 2-3 hours, again using low. It turned out PERFECT. You can add some mozzarella cheese at the end if you want some on top. Just add it about 10 minutes before serving.

Salsa Chicken. OMG!! This is to DIE for! This by far has been one of the best tasting meals I've ever made...in a crock pot or not! It is so easy and soooo yummy. My mouth is literally watering thinking about it and I just had left overs for lunch! You can use thighs or whatever chicken you have. I never buy thighs, only boneless, skinless chicken breast, so that is what I had. I had three, not over-sized, chicken breast. I sprayed Ole Betsy and added the chicken. Then I opened up a can of whoop ass black beans, rinsed and added to the pot. I open a jar of Pace "original style" picante mild sauce (16 oz) added it to the pot. Then I added a can of drained corn. I also picked some cilantro from my garden and added. If you're using thighs you probably won't need as much sauce but breast will dry out so you need more sauce. Put Ole Betsy on low and let it cook for about 6 hours. The chicken just fell apart in the pot when I stirred it. It was wonderful! I served it with yellow rice (because I don't like the prepackaged mexican rice). I also had Bear stop and get some chips and salsa from our favorite Mexican restaurant. I had cheese dip that I purchased from Wally world. So we made nachos with it. It was so freaking good! For lunch I just had the rice and chicken...still so yummy!

Now for the okay meals. And they were only okay because they were either undercooked or overcooked. Once I get the timing down, they will be fantastic too!

I don't even know what to call this. It's my own recipe that I modified from a couple of recipes. I use eye of round steak (cause that's what my local butcher has) but you can use any steak. I cut it into bite size pieces and brown before putting it into Ole Betsy. Spray the pot first then add tomatoes (canned or fresh). Then slice an onion and add. I also added cut carrots and celery. Then add the beef. I also added garlic but sometimes I don't. Cook on low for about 3 hours. The first time I made this I only let it cook for about 2 1/2 hours. The veggies were still crispy and that didn't go over well with Bear, so next time I'll cook for 3-3 1/2 hours. I made mashed potatoes before I left, put them in the fridge and warmed them up when I got home. Simple, yummy meal!

Philly chicken cheese sandwiches. No, you're eyes are not going wonky on you! I made the filling for the sandwiches in Ole Betsy. I cut the chicken in bite size pieces then salt and pepper them. I sliced some onion. Sprayed the pot and then added the onion and the chicken. That's it! Turn on low.  When I cooked this the first time, I cooked it for way too long (about 6-7 hours). The chicken tasted okay but had the texture of saw dust.  Being new to cooking with a crock pot I have no idea how long things will take to cook and with it being chicken, I didn't want to get food poisoning so I over cooked it. So next time, I'll cook it for about 4-5 hours on low. Put the filling on a bun, add your favorite cheese (white american here) and put it in the oven until toasted and cheese is melted. So yummy and fast.

I'm really enjoying my crock pot and all it offers me. I love cooking but some days, the easier the better. I'll blog later about the new recipes I tried earlier this week. We're desperately trying to save money and our eating out budget was the first to be reduced. I'm trying to make new, interesting meals so it won't feel like we're missing anything. Stayed tuned for that blog.

Happy cooking and eating!

Friday, April 13, 2012

Let's Knit!

I got the cutest pattern for some dish clothes from Lily-Sugar N Cream. I tried to pin it to my Pinterest knitting board but the picture wouldn't show so I'm circumventing the board and putting in my blog which is also on Pinterest. Sneaky...I know. lol. Can't wait to knit a few of these. They look adorable.

Happy knitting!

Thursday, April 12, 2012

What a Hairy situation


I'd like preface this by saying that I LOVE my hair (vain to say, I know, but it's the truth). It has always been soft and silky. I can remember my grandmother couldn't french braid my hair because it was "alive" as she said. It would just crawl out of the braids. But after much dyeing of my hair, after all if I didn't I'd be white headed, I've irritated my scalp horribly. I decided to start looking for a more natural way to wash my hair so it would ease the irritation.

My friend suggested the baking soda "no poo" shampoo. It's quite simple: 1 tablespoon of baking soda to a cup of water. That's it. You shampoo with it about 2-3 times a week to clean your scalp. The best method I found is to spray my hair with the solution and massage it into my scalp. I followed it up with her first suggestion of Apple Cider Vinegar conditioner: 1 tablespoon of ACV and a cup of water. Well my hair was a dried, crazy mess!

I decided to google some recipes online and found this website with a gob of information on natural hair care (even dying w/out chemicals..yipppeee).

So I made up the conditioner that called for 1/4 cup of olive oil, 1/4 cup of vegetable oil, 1/2 cup water and 2 tbs of honey. I didn't like the thought of putting vegetable oil in my hair so I used all olive oil. Man, was my hair greasy and disgusting feeling! I went and bought some Dr. Bonner's Lavendar castile soap to wash my hair. I washed my hair with the castile soap and with the baking soda "shampoo" and I retried the conditioner by using my friend's recipe (2 oz honey, 12 oz boiling water, mix, then add 2 oz olive oil, in her case she used sunflower oil w/added vitamin E). My hair wasn't as greasy, but it still was too greasy for me. The next day it was horrible, but I managed to get through it.

So today I created yet another conditioner..this time NO oil. I mixed 2 tbls of honey with 2 cups of boiling water. I washed my hair with castile soap and used the new conditioner. My hair is much better...not as near as greasy as the last few days. The next time I will use the castile soap and baking soda "shampoo" with the no-oil conditioner to see if my hair will be soft and silky like it was when I was using the chemical filled shampoos and conditioners. As you can see from the above picture...it's got some fly-aways but thank goodness it's not greasy looking/feeling. I'm also sure it will take my hair a few days to weeks to adjust.

I can't wait to try the no chemical hair dyes. I'm just waiting on my herbs to get here to do that. I also need to order some henna and indigo. If I can't find a natural way to dye my hair, I'm afraid I'm Paula Deen bound.

Monday, March 5, 2012

What's for dinner 3/5/2012

Something so freaking yummy! I kind of played on a few things to make this meal.

First I had some Eye of Round Steak that is sooo delicious. I cut it into bite size pieces. I sliced a sweet onion. If I would of had some fresh garlic, I would have minced it...but I didn't so I used garlic powder.

I sauteed the onion first. Once I had it transparent, I put it on a plate to get it out of the way (but not for long). I then browned the meat. I added salt, pepper and the garlic powder. You know, just to taste. After the meat was browned, I put the onions back in the pan. Speaking of pans, I bought a non-stick green pan. That was one reasons why I sauteed the onions first, to give it more flavor. I then added a can of petite diced tomatoes (again, only cause I didn't have fresh tomatoes). That was it. I let it simmer for about 10 minutes with the lid on. After that, I took the lid off and simmered for 20 minutes while my potatoes were cooking for the mashed potatoes that I made to go along with the meal. After 20 minutes, I added some frozen spinach (again, cause I didn't have fresh). I also added some Parmesan cheese.

I served the meat mixture on top of the mashed potatoes and had rolls with it too. Such an easy, fast and yummy meal. I've made this before w/ Rotel tomatoes and yellow rice for a Mexican flavor. Amanda didn't like that...too spicy. This meal though, she ate it up!

So grab a pan, some steak, onion and tomatoes and eat!

Thursday, July 21, 2011

What's for dinner 7/21/11

Something so good it made me say, "mmm" at every freaking bite!!! I ran across this recipe a few days ago. We had it for supper tonight and OMG was it DELICIOUS.

I was afraid it would be spicy, but it wasn't at all. I did omit the jalapeno pepper from the salsa just to make sure the heat was not too much. I didn't have fresh cilantro; I used dried instead. The next time I make it, I'll use fresh. I also used three Roma tomatoes. Also, I didn't put a lot of mayo on them except for one, and it does taste much better with a little more mayo. Oh and I also didn't have a fresh lime so I used bottle lime juice. Next time, I'll have to remember the fresh lime.

It is time consuming to prepare but sooo worth it. I made the marinade,salsa sliced the pepper, mango and onion while I was waiting on Baby Girl to finish her math work. Putting the sandwiches together was time consuming too but it was nothing that I hadn't done before. It was suggested on the site to add the mango in the salsa, but I didn't know what the mango would taste like (and wasn't sure Bear would like it) so I sliced them instead. Next time, I just may take that suggestion and add them to the salsa to omit one step in the sandwich preparation.

To me, the french bread set this sandwich way above any other. In all, I'd give this recipe 5 gold stars!!

Bon Appetit!

Friday, March 18, 2011

Blah Thursday!

Okay so I'm not having the best Thursday today.

Baby girl's birthday was yesterday. We had a splendid time. We started the day off by eating at Olive Garden. This is our annual birthday luncheon for Baby Girl. She loves the place. We really only go on her birthday. Baby Girl and I shared the baked ziti. OMFG! That was damn near the best ziti I've eaten! Bear had a pizza. We all shared a slice of their lemon cake...delish!

After the bellies were full, we proceeded to Toys R Us for BG to get her shopping on! It was so sweet. Bear went to customer service and told them it was BG birthday and they announced it over the intercom! Baby Girl barely noticed. LOL. But both Bear and I got misty eyed! We're such softies!

With her toy shopping done, we headed to Discovery Mills to Lunar Golf so she and Bear could play putt-putt. I do not, I repeat, do not play putt-putt. I have no patience or tolerance for it. I kept score. BG had a blast, so that's all that matters.

With our shirts still a-glow, we then went to Justice so BG could get her fashion on! She bought a few tops and shorts for Summer. She looks super cute in them.

Once her shopping spree was over, we headed home and spent the rest of the night just relaxing.

So what does all of our birthday activities have to do with me having a crappy Thursday some of you may be wondering...well of course, I'm going to tell you! I recounted the story of BG's birth to her yesterday. Many know the story and how very blessed I am to have my baby girl. The night before I laid in bed thinking, "what if all of this is a dream? What if 9 years ago my baby had died. What if Dr. G wasn't in time? and now I'm insane and I'm going to be sane in the morning and I'll have no BG." I know, morbid thinking, but that's how my brain rolls sometimes. But thankfully I woke up sane and my baby girl was here safe and sound. Again, I told her birth story to her. Thinking of her birth and how my mom was there and now my parents are not here another year to celebrate with us and to see how wonderful my baby girl is just breaks my heart. So there you have it! It's not often I let the fact my parents are gone affect me, but today I just couldn't control it.

Bear was my rock, as usual. He never lets me down. I really don't know what I did in my past life to deserve him but I'm glad I did it! No one would ever complete me like Bear. As I've said time and time again, BG is my heart, Bear is my soul. We are a rocking family! Tomorrow will be a better day...you can bet a bottom dollar on it!

Wednesday, February 23, 2011

What's for dinner 2/23/2011

Prepare yourself for jealousy!! Tonight I made grilled chicken marinated in olive oil, basil, garlic w/ a pinch of salt & pepper. Along with the chicken I made grilled asparagus & red peppers also marinated in olive oil, basil and garlic. I then used some of the grilled peppers to make a cream sauce. I know, you're drooling. I can't blame you.


So here's how I did it:

To marinate the chicken you just drizzle about 1-2 tbs of olive oil on the chicken while it's in a bag. I then minced a clove of garlic and about 3 basil leaves. I put the garlic & basil in the bag. I then lightly salted and pepper the chicken. Viola! That's it. Put it in the frig for about an hour and you're good to go.

I pretty much did the same thing with the asparagus & peppers. I cut the peppers into strips. I kept them in the frig for about the same time.

So I grilled some peppers for about 10 minutes then used them for my sauce. I minced another garlic clove and ever so gently sauteed it in about a tbs of butter. Then I used 1/2 pint (if I had a whole pint I would have used that) of cream and then used a cup of milk because I didn't have 2 cups of cream. Added another tbs of butter and then I added another 2-3 leaves of fresh basil along with salt, pepper, some onion powder and a dash of poultry seasoning. I brought it to a boil and then simmered it for about 20 minutes. I blended the peppers in the sauce so there would not be chunks.

While the sauce was simmering, I grilled the chicken and the veggies. I put the chicken on for about 8 minutes then flipped the chicken and put the veggies on for the remainder of the cooking time, about 18 minutes. Now I took my chicken off in 16 minutes and let it sit for about 10 while I was waiting for the rigatoni to cook. Double check your chicken and make sure the temp is 165. You don't want to under cook your chicken, but also don't want it to be leather.

I carved the chicken and laid it ontop of the pasta, added the veggies and then smothered it with the sauce. It was delish!

Okay, so stop drooling; go get your ingredients and have a hearty plate of Grilled chicken, red peppers and asparagus in red pepper cream sauce. Yummm!

Thursday, January 6, 2011

Another year has come and gone...

I've meet some really rad people and kept them around. Others have come and gone. I've learned a little more about myself through those experiences. None of them bad, just revelations about me and how I see things. I guess I've grown. Here are just a few things that happened in 2010. I guess I'm writing this more for me, more of a synopsis of my life. Please continue to read or not...

I taught myself how to knit almost having a nervous breakdown while doing so. I've knitted hats and scarves for my friends, Amanda, family and myself. In 2009 Barry and I gave blood during the holiday. We both thought it would be a great tradition to carry out every year...giving back to the community. Well all that went to hell when I promptly fainted walking to the car. It was not a pleasant ordeal for me and I felt funky for a few days afterwards, being a chicken, I just didn't want to go through that again, so I opted for knitting scarves and hats to give to the homeless. I didn't have time to knit them during the holidays, so I'm starting that project tonight.

I almost died in March from an allergic reaction to medication. I had had several bladder infections and one of the meds actually cause me to go into anaphylactic shock. Barry got me to hospital (not that I thought I was going to make it. I thought for sure I was going to die in the car)and after being stuck with epi(which brought on an axiety attack) I was on my way home. After a couple of weeks recouping...I was right as rain. All is good now. I drink my water religiously.

Amanda finished 3rd grade making all A's. We actually took the summer off. She was so ready to start school I had to up my plans for a late August start to a late July early August start. She was bored of swimming and doing nothing. I didn't blame her; I was bored too. She started 4th grade strong and is still solid. She loves math again and I am thrilled! Math has been a struggle the last few years. I research lots of curriculum and then decided I wasn't going to use a curriculum. I was going to teach her math by doing and living not by a text book. It's working like a charm. She's gotten her natural ability back and I'm glad. No more tears math...hmmm maybe I should write a curriculum?

Barry and I are still going strong. I swear, I don't think we could love each other more than we do now. He's my everything. He really does complete me. I never get tired of him. The only complaint I have is that we don't have enough time together...just us. I love Amanda with all my being, but damn it, I miss Barry. I miss us. We had 15 years of us and sometimes, not often, I really miss just me and him. But then I look at my baby girl and it all washes away. I wouldn't change anything. Soon enough I'll wake up and it will be just us again and I will cry.

So that's my year in a nut shell. Some of it eventful, some not. It was life in Gina's World!